Table of Contents
Recipe Overview
There is something undeniably magical about the winter season, and these Snowman Cake Pops capture that spirit in a single, delicious bite. Imagine a truffle-like center—moist, dense, and rich, enrobed in a crisp, vanilla-scented white chocolate shell. These whimsical treats are more than just a dessert; they are edible art that brings a touch of Winter Wonderland charm to any table. Whether you are hosting a seasonal gathering or looking for a cozy baking project on a snowy afternoon, these pops offer a perfect blend of creative fun and comforting flavors. They are designed to bring smiles to both kids and adults, making them a standout addition to any Holiday Cake Pop spread.
Quick Facts / Recipe Snapshot
- Total Time: 1 Hour 40 Minutes (includes chilling time)
- Yields: 20–24 Snowman Pops
- Difficulty Level: Intermediate (Requires patience for dipping)
- Estimated Cost: $15 – $20
- Dietary Profile: Vegetarian, Nut-Free Adaptable
- Texture: Fudgy cake interior with a snappy candy shell
What Is [Snowman Cake Pops]?
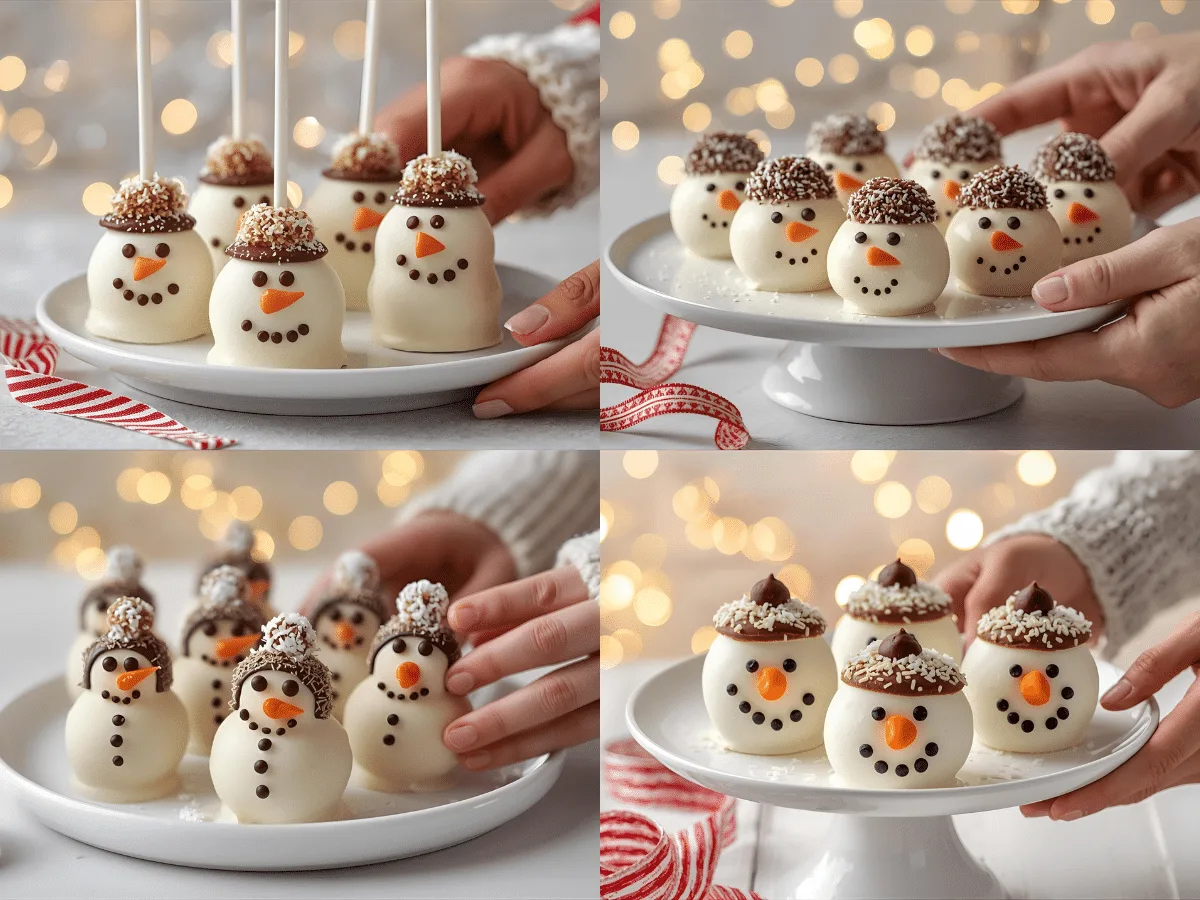
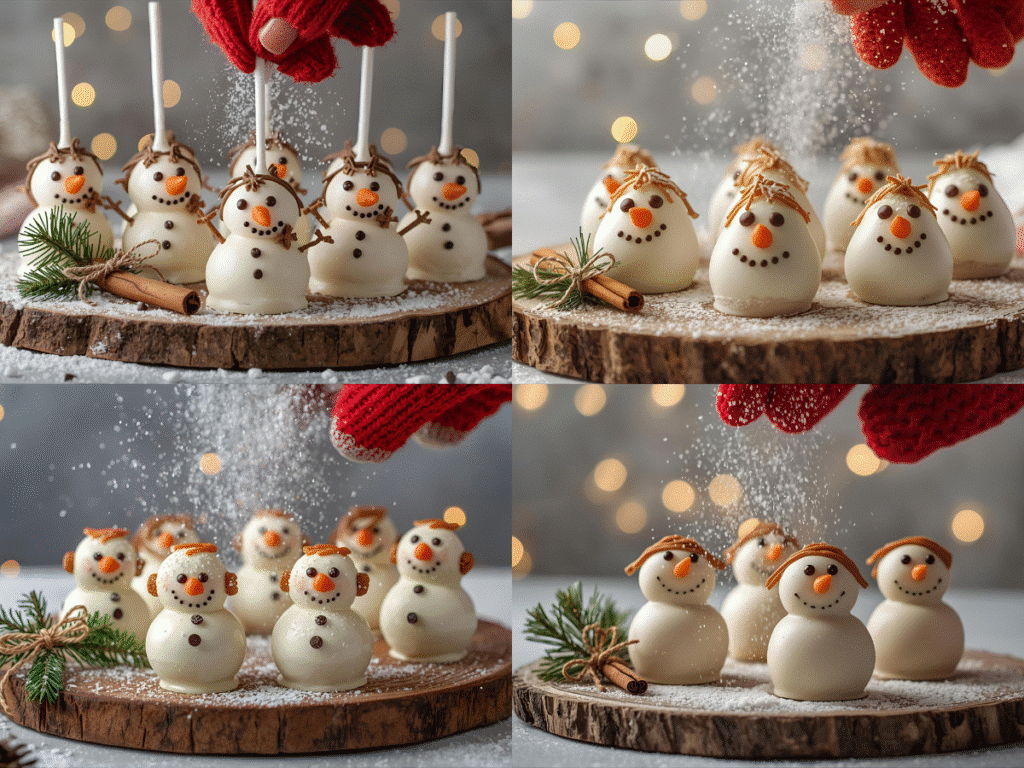
Snowman Cake Pops are a delightful evolution of the classic cake truffle. Instead of a simple sphere, this recipe involves stacking two cake balls—a larger one for the body and a slightly smaller one for the head—to mimic the silhouette of a snowman. The “dough” is created by mixing crumbled baked cake with creamy frosting, resulting in a texture similar to cookie dough but fully cooked and safe to eat. Once shaped, they are dipped in white candy coating and decorated with simple icing details. They are the ultimate Cake Pop Snowman experience, bridging the gap between a craft project and a gourmet dessert.
Origins & Inspiration
The concept of “cake on a stick” gained massive popularity in the United States around 2008, revolutionizing home baking by turning cake scraps into premium treats. This Snowman Cake Pop variation takes inspiration from the joy of building snow figures during the cold months. It transforms a fleeting outdoor activity into a lasting indoor treat. While the technique is modern American, the practice of shaping marzipan or sugar paste into figures has European roots. This recipe celebrates the Winter season, focusing on the universal joy of snow days rather than specific religious holidays, making it a perfect fit for any Seasonal celebration.
Why You’ll Love This Recipe
You will adore this recipe for its versatility and charm.
- Crowd-Pleaser: The adorable Cake Pop Designs are instant conversation starters.
- Texture Contrast: The snap of the coating followed by the soft, velvety interior is satisfying.
- Customizable: You can dress your snowmen in different colored “scarves” using candy melts.
- No-Bake Decoration: While the cake is baking, the assembly is a fun, heat-free activity perfect for family bonding.
Ingredients & Notes
- 1 Box Vanilla Cake Mix: Acts as the base. You will also need the eggs, oil, and water listed on the box. Note: You can swap for a gluten-free mix if needed.
- 1/2 Cup Cream Cheese Frosting: The binder that turns crumbs into dough. Tip: Add slowly; you want a playdough consistency, not slush.
- 1 Bag (12 oz) Bright White Candy Melts: Essential for the “snow” look. Note: Do not use regular white chocolate chips as they are too thick for dipping.
- 1 tsp Vegetable Shortening or Coconut Oil: Vital for thinning the candy melts to ensure a smooth, drip-free finish.
- 20 Paper Lollipop Sticks: 6-inch sticks are the standard size.
- Orange Sprinkles (Jimmies): Used for the carrot noses.
- Black Decorating Gel or Edible Marker: For creating the eyes, mouth, and buttons.
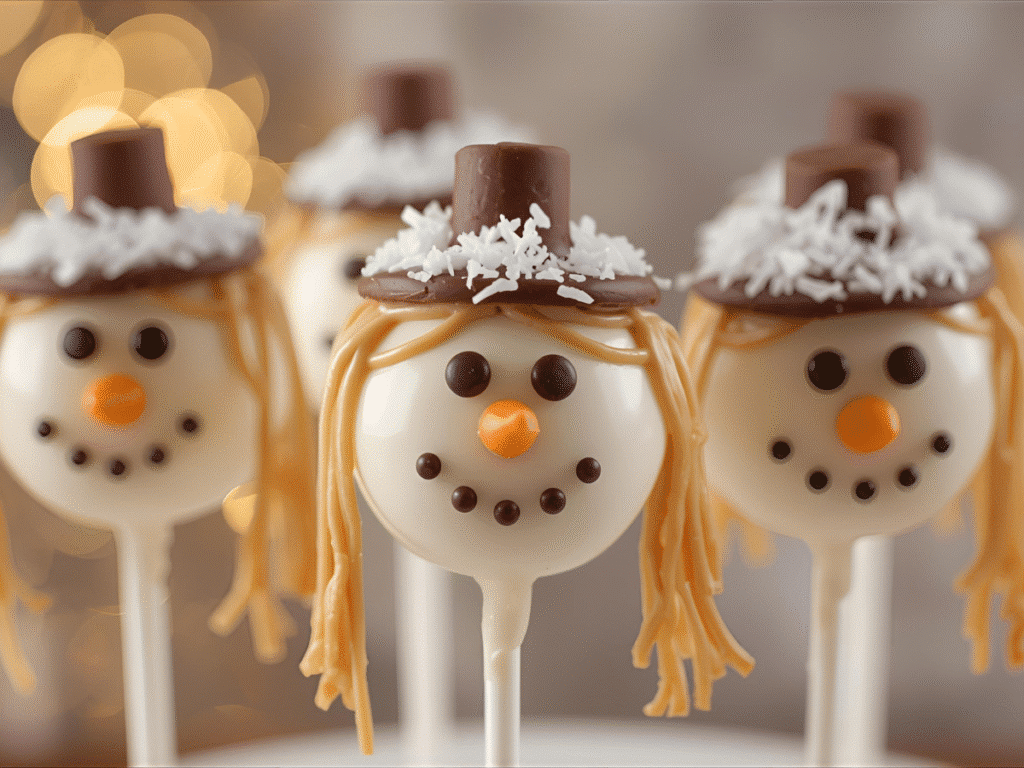
- Mini Chocolate Cookies (e.g., Oreos): Optional, for creating top hats.
Step-by-Step Instructions
- Bake the Foundation: Preheat your oven and bake the cake according to the package directions. Allow it to cool completely on a wire rack. Critical: If the cake is warm, the frosting will melt, making the dough greasy.
- Create Crumbs: Break the cooled cake into a large bowl. Use your hands to crumble it until it resembles fine breadcrumbs.
- Mix the Dough: Add the frosting a tablespoon at a time. Mix thoroughly until the dough holds together when squeezed. It should be moist but firm.
- Shape the Bodies: Roll the dough into balls. You need 20 large balls (about 1.5 inches) for the bodies and 20 smaller balls (1 inch) for the heads.
- The Stack: Place the balls on a parchment-lined sheet. Refrigerate for 20 minutes to firm up.
- Structural Glue: Melt a small amount of candy coating. Dip the tip of a stick into the melt, push it through the bottom of a large ball, and then immediately into a small ball to stack them. The candy acts as glue.
- Chill to Set: Freeze the stacked snowmen for 15 minutes. This ensures they don’t fall apart during the final dip.
- The Dip: Melt the remaining candy melts with shortening until silky smooth. Dip each snowman straight down, ensuring it is fully submerged. Lift out and gently tap the stick to remove excess.
- Decorate: While the coating is wet, carefully place an orange sprinkle for the nose. Let it dry completely before piping on the eyes and buttons.
Tips for Perfect [Snowman Cake Pops] Every Time
- Temperature Control: The cake balls should be cold but not frozen solid. If they are too frozen, the warm candy coating will crack as the cake expands while thawing.
- Consistency is Key: Your melted candy should flow like heavy cream. If it’s too thick (like peanut butter), add more shortening.
- Styrofoam Stand: Have a block of styrofoam ready to stand the pops in while they dry. This prevents flat spots.
- Clean Cracks: If a pop cracks, dab a little melted coating over the crack and smooth it with your finger. It adds character to the Snowman Cake!
Variations, Swaps & Add-Ins
- Flavor Burst: Add a drop of peppermint extract to the cake dough for a refreshing Winter twist.
- Color Splash: Use blue or pink candy melts for the “scarf” decoration to fit a specific party theme.
- Cookie Crunch: Mix in crushed sandwich cookies into the dough for a textured interior.
- Dairy-Free: Use a vegan cake mix and a dairy-free frosting binder. Ensure your candy melts are dairy-free.
Ingredient Spotlight
Candy Melts: These are the secret weapon for professional-looking Cake Pop Decorating. Unlike real chocolate, which contains temperamental cocoa butter, candy melts use vegetable oils. This gives them a higher melting point and a glossy finish without the complex process of tempering. They come in vibrant colors and specifically “Bright White,” which mimics snow better than the yellowish hue of natural white chocolate.
Serving Suggestions (Presentation & Plating)
Create a stunning Winter Wonderland Cake Pops display by filling a deep platter with granulated sugar or desiccated coconut to resemble a snowdrift. Poke the sticks into a foam block hidden underneath the “snow” so the snowmen appear to be standing in a field. This presentation makes them the centerpiece of any Holiday dessert table.
Best Sides to Serve With [Snowman Cake Pops]
Since these pops are sweet and rich, pair them with items that provide balance.
- Tart Fruit: Fresh cranberries or sliced kiwi offer a refreshing acidic contrast.
- Salty Snacks: A bowl of salted pretzels or popcorn complements the sugary coating perfectly.
- Savory Bites: Mini quiches or cheese straws work well if serving these at an afternoon tea.
Flavor Pairing & Beverage Match
- Hot Cocoa: The classic winter pairing. The creamy cocoa enhances the vanilla notes of the pop.
- Chai Tea Latte: The spices in chai (cinnamon, cardamom) cut through the sweetness of the white chocolate.
- Sparkling Cider: A crisp, bubbly apple cider provides a palate-cleansing effect between bites.
Make-Ahead & Storage Guide
- Prep Ahead: You can bake the cake and roll the undipped balls up to 2 days in advance (store in the fridge).
- Room Temperature: Fully dipped and dried pops can stay at room temperature for up to 5 days in an airtight container.
- Freezer: You can freeze undipped cake balls for up to a month. Thaw in the refrigerator before dipping. Avoid freezing finished pops as the coating may sweat and become sticky.
Budget & Pantry Strategy
This recipe is incredibly budget-friendly. Using a boxed cake mix is economical and consistent. To save more, use leftover cake from another project—the crumbs don’t know the difference! Buy sprinkles in bulk or use leftover Holiday sprinkles from previous baking sessions. A block of floral foam from the dollar store works just as well as an expensive cake pop stand.
Scaling for a Crowd
- Doubling: The recipe scales easily. A standard box mix makes about 24 pops. Two boxes will yield nearly 50, perfect for school fairs or large Seasonal parties.
- Batch Processing: When making a large batch, keep the undipped balls in the fridge and take out only 5-10 at a time to prevent them from getting too soft.
- Melting Pot: For high volume, use a small slow cooker or a dedicated candy melting pot to keep the coating at the perfect fluid temperature without burning.
Weeknight Workflow Planner
- Monday: Bake the cake while making dinner. Let it cool overnight.
- Tuesday: Crumble the cake, mix with frosting, and roll the balls. Store them in a Tupperware container.
- Wednesday: Melt the candy, dip the pops, and decorate. This breaks the effort into 20-minute segments, making Snowman Cake Pops Easy to fit into a busy schedule.
Kids & Family Friendly Adaptations
This is a fantastic recipe for getting kids involved. While an adult should handle the hot candy melts, children excel at crumbling the cake and rolling the “playdough.” Set up a decorating station with different sprinkles so they can personalize their own Snowman Cakepops. It’s a wonderful sensory activity that builds fine motor skills.
Troubleshooting & Fixes
- Pops Falling Off: This usually means there is too much frosting in the dough (too heavy/oily) or the stick wasn’t dipped in candy before inserting.
- Dull Coating: If the pops look matte instead of shiny, the humidity might be too high, or the pops were refrigerated immediately after dipping (which causes condensation). Let them dry at room temperature.
- Leaking Oil: If oil seeps through the coating, the cake balls were too warm when dipped. Ensure they are chilled properly.
Cultural or Seasonal Context
In many Northern Hemisphere cultures, the snowman is an icon of the Winter season, representing the joy of the first snowfall. Unlike specific holiday figures, the snowman is universally embraced as a symbol of seasonal fun. These Snowman Cake Pops bring that outdoor joy inside, making them appropriate for any winter event, from Solstice celebrations to New Year’s Eve parties.
FAQs
- Can I use a different cake flavor? Absolutely! Red velvet, chocolate, or even lemon cake works great. The white coating hides the interior color.
- How do I get the frosting smooth? Tap the stick gently on the side of the bowl or your wrist. Do not shake it vigorously, or the head might fly off!
- Can I use chocolate chips instead of candy melts? You can, but you must add coconut oil to thin it, and the color will be off-white (ivory) rather than bright white.
- Are these suitable for shipping? They are fragile. If shipping, wrap each head individually in bubble wrap and nestle them securely in a box with plenty of padding.
Love this recipe? Discover even more!
Explore my Pinterest boards for a world of delicious recipes, fresh ideas, and inspiring flavors. Click here and start pinning your next favorite dish! ➜https://www.pinterest.com/ElitesRecipes/
PrintSnowman Cake Pops: Winter Holiday Treat

These adorable Snowman Cake Pops are the ultimate holiday treat. Moist cake truffles stacked to look like snowmen, dipped in white chocolate, and decorated with festive details. Perfect for Christmas parties and gifting!
- Prep Time: 45 minutes
- Cook Time: 30 minutes
- Total Time: 1 hour 30 minutes
- Yield: 20 pops
- Category: Dessert
- Method: No-Bake Assembly
- Cuisine: American
- Diet: Vegetarian
Ingredients
1 box (15.25 oz) vanilla or chocolate cake mix (plus ingredients listed on box: eggs, oil, water)
1/3 cup cream cheese frosting (or more as needed)
12 oz white candy melts or vanilla almond bark
1 tsp vegetable shortening or coconut oil (to thin chocolate)
20 lollipop sticks
1/4 cup orange sprinkles or fondant (for noses)
1 tube black decorating icing (for eyes and buttons)
20 mini chocolate cookies (optional, for hats)
Instructions
1. Bake the cake according to package instructions in a 9×13 pan. Let cool completely.
2. Crumble the cooled cake into a large bowl until fine crumbs form.
3. Mix in cream cheese frosting, one tablespoon at a time, until dough holds its shape.
4. Roll dough into 20 large balls (bodies) and 20 small balls (heads).
5. Place balls on a parchment-lined baking sheet and refrigerate for 20 minutes.
6. Melt a small amount of candy melts. Dip the tip of a lollipop stick into melted candy, push through a large ball, then a small ball to stack them.
7. Freeze stacked snowmen for 15 minutes to set.
8. Melt remaining candy melts with shortening until smooth and fluid.
9. Dip each snowman carefully, tapping off excess coating. Stand upright in a styrofoam block.
10. Decorate immediately with orange sprinkle noses while wet. Let dry, then pipe eyes and buttons with black icing.
Notes
Ensure cake balls are cold but not frozen solid to prevent cracking.
If candy coating is too thick, add more shortening.
Store in an airtight container at room temperature for up to 5 days.