Table of Contents
Why You’ll Love These Red Velvet Cookies
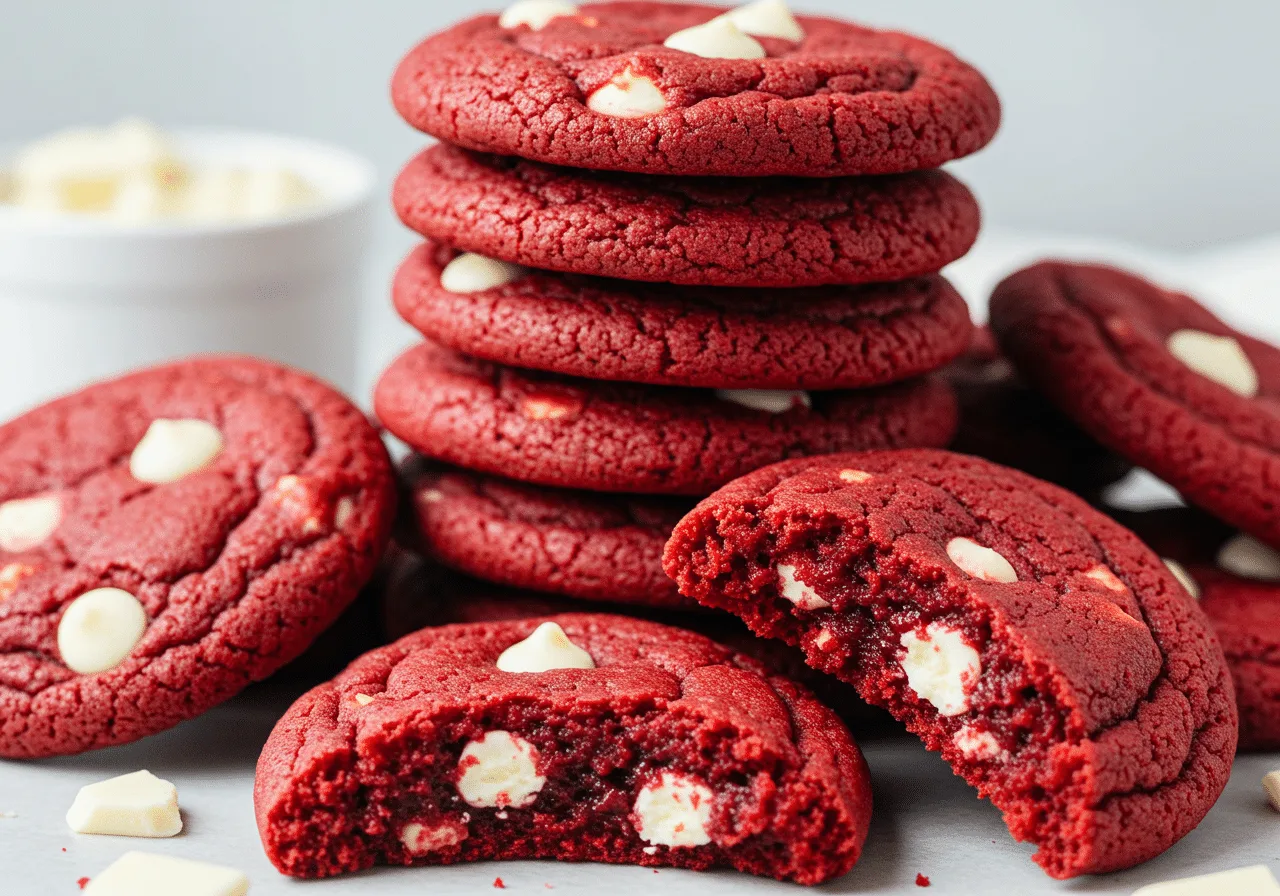
There’s something uniquely captivating about red velvet. With its deep crimson color, subtle cocoa undertones, and tender crumb, red velvet has always been more than just a dessert — it’s a celebration of texture, flavor, and elegance. Now imagine all that charm condensed into a soft, chewy cookie with a rich, creamy center. That’s exactly what you get with these Red Velvet Cookies.
These cookies bring together the best qualities of red velvet cake and classic chocolate chip cookies: a perfect chew, a hint of cocoa, and a bold, luxurious look. Every bite is balanced — not overly sweet, not too chocolatey — but just right, with a velvety smoothness that melts in your mouth.
Red Velvet Cookies are also incredibly versatile. They fit perfectly on a holiday cookie platter, as a Valentine’s Day treat, or even as a festive addition to a Halloween dessert table. Their vibrant color and buttery aroma make them stand out beside pumpkin pies, sugar cookies, or chocolate desserts.
Whether you bake them with a cream cheese filling, add white chocolate chips, or drizzle with frosting, these cookies always deliver that unmistakable “wow” factor.
Ingredients Information
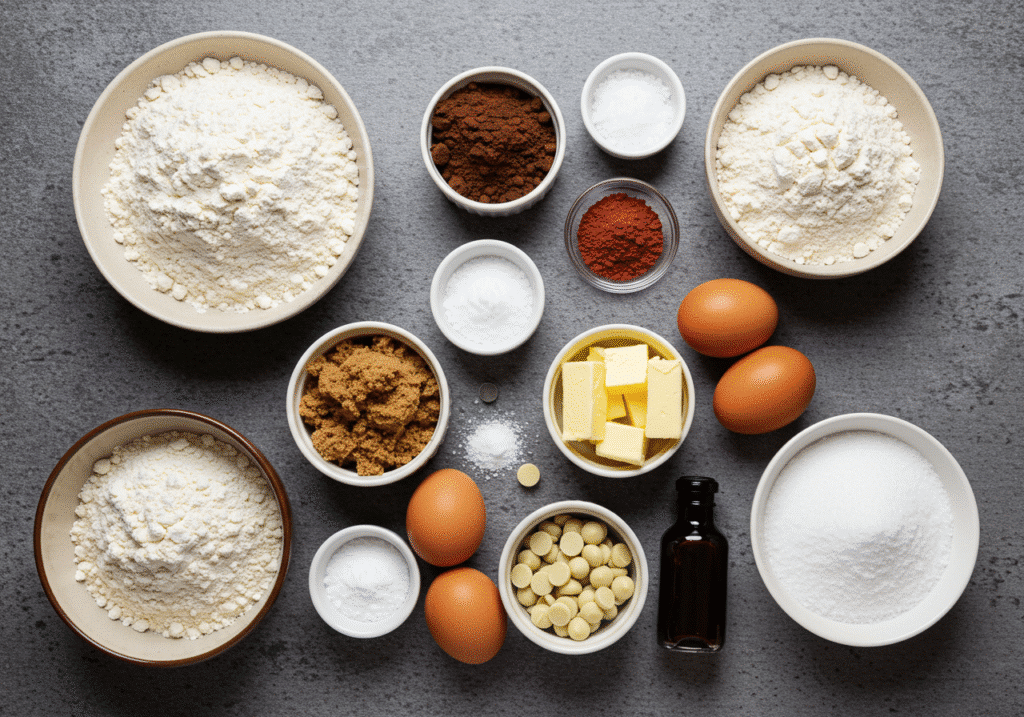
The secret to perfect Red Velvet Cookies lies in understanding the purpose of each ingredient — they all contribute to that soft, cake-like yet chewy texture that defines this recipe.
- All-purpose flour – The base of the cookies, providing structure and stability.
- Unsweetened cocoa powder – Adds subtle chocolate depth without overpowering the red velvet flavor.
- Baking soda – Helps the cookies rise and stay soft in the center.
- Salt – Balances the sweetness and enhances the overall flavor.
- Unsalted butter – Softened butter adds richness and helps create a chewy texture.
- Granulated sugar & brown sugar – The combination keeps the cookies both tender and flavorful. Brown sugar adds moisture and a slight caramel note.
- Eggs – Bind the ingredients and provide structure.
- Vanilla extract – Enhances the warm, aromatic flavor base.
- Red food coloring – The signature element that gives these cookies their vibrant red hue.
- White chocolate chips – A creamy contrast to the cocoa notes, adding both sweetness and visual appeal.
Optional:
- Cream cheese filling – For a stuffed version, mix cream cheese with powdered sugar and vanilla to create a decadent filling that turns each bite into a melt-in-your-mouth experience.
Step-by-Step Instructions
Step 1: Preheat and prepare
Preheat your oven to 350°F (175°C). Line your baking sheets with parchment paper to ensure even baking and prevent sticking.
Step 2: Mix dry ingredients
In a medium bowl, whisk together the flour, cocoa powder, baking soda, and salt. Set aside. This ensures all the dry ingredients are evenly distributed.
Step 3: Cream the butter and sugars
In a large bowl, beat the softened butter, granulated sugar, and brown sugar together until light and fluffy (about 2–3 minutes). This process creates air pockets that help the cookies bake evenly and stay tender.
Step 4: Add wet ingredients
Beat in the eggs one at a time, then mix in the vanilla extract and red food coloring. Adjust the amount of food coloring based on your preference — a few drops for a darker crimson or more for a brighter hue.
Step 5: Combine wet and dry mixtures
Gradually add the dry ingredients to the butter mixture, mixing until just combined. Do not overmix; this ensures the cookies stay soft and chewy.
Step 6: Add white chocolate chips
Fold in the white chocolate chips using a spatula. Make sure they are evenly distributed throughout the dough.
Step 7 (Optional): Add cream cheese filling
For stuffed cookies, roll the dough into balls, flatten slightly, place a small dollop of cream cheese mixture in the center, and then seal with another portion of dough. Smooth the edges to encase the filling completely.
Step 8: Bake
Scoop tablespoon-sized portions of dough onto your prepared baking sheets, leaving about 2 inches between cookies. Bake for 10–12 minutes or until the edges are set but the centers are still slightly soft.
Step 9: Cool
Let the cookies cool on the baking sheet for 5 minutes before transferring them to a wire rack to cool completely. This helps them firm up while staying chewy in the center.
Storage Information
Red Velvet Cookies are as practical as they are delicious. They store beautifully and taste even better the next day when the flavors fully meld.
- Room temperature: Store in an airtight container for up to 5 days.
- Refrigerator: If filled with cream cheese, refrigerate for up to 1 week.
- Freezer: Freeze baked cookies (or unbaked dough balls) for up to 3 months. Thaw at room temperature or bake directly from frozen, adding 1–2 extra minutes to the baking time.
For the best texture, place a slice of bread in the storage container to keep the cookies soft.
Helpful Tips
- Use room temperature ingredients. Softened butter and eggs mix better, giving you an even texture.
- Don’t skip the brown sugar. It keeps the cookies chewy and flavorful.
- Avoid overbaking. The centers should look slightly underdone when you take them out — they’ll firm up as they cool.
- Chill the dough (optional). For thicker cookies, refrigerate the dough for 30 minutes before baking.
- Use gel food coloring. It provides a deeper color without adding extra liquid.
- Add texture. Sprinkle coarse sugar on top before baking for a beautiful sparkle and a slight crunch.
Variations
These cookies are endlessly customizable. Try one of these variations to keep your baking exciting:
- Stuffed Red Velvet Cookies – Add a cream cheese filling for a bakery-style twist.
- Red Velvet Sandwich Cookies – Spread cream cheese frosting between two cookies.
- White Chocolate Drizzle – Melt white chocolate and drizzle over cooled cookies for an elegant finish.
- Red Velvet Crinkle Cookies – Roll dough balls in powdered sugar before baking for a snowy, festive look.
- Dark Chocolate Red Velvet – Replace white chocolate chips with dark chocolate chunks for a bolder flavor.
- Holiday Red Velvet Cookies – Add green candy-coated chocolates or sprinkles for a Christmas touch.
- Halloween Red Velvet Cookies – Drizzle black or orange icing and serve alongside Halloween pies for a spooky yet elegant dessert spread.
Frequently Asked Questions (FAQ)
Can I use natural food coloring?
Yes. Beetroot powder or natural red dyes work well, though the color may be slightly less vibrant.
Why are my cookies dry?
Overbaking or adding too much flour can dry them out. Use a kitchen scale for accuracy and remove them when the centers are still soft.
Can I make these gluten-free?
Yes, substitute all-purpose flour with a high-quality gluten-free 1:1 blend.
What type of cocoa powder works best?
Use unsweetened natural cocoa powder for that classic red velvet flavor. Dutch-processed cocoa will make the cookies darker and richer.
How can I make them more festive for the holidays?
Top with white chocolate drizzle, red sprinkles, or heart-shaped decorations. For Halloween, pair with pumpkin spice cookies or pies for contrast.
Related Recipes You’ll Love
If Red Velvet Cookies are your new obsession, you’ll also love these complementary treats:
- Double Chocolate Cookies – Rich, fudgy, and ideal for chocolate lovers.
- Sugar Cookies – Simple, buttery, and great for decorating.
- Cinnamon Sugar Cookies – Sweet and warm, perfect for cozy seasons.
- Pumpkin Spice Cookies – Soft, spiced, and ideal for autumn gatherings.
- Lemon Shortbread Cookies – Light, crumbly, and beautifully zesty.
These all pair wonderfully on dessert platters — especially next to Red Velvet Cookies and festive Halloween pies for a seasonal display that’s visually stunning and delicious.
Share the Love on Pinterest
Red Velvet Cookies are the kind of dessert that makes any occasion feel special. Their bold color, soft chew, and delicate cocoa flavor make them unforgettable. Whether you bake them for holidays, celebrations, or cozy nights in, they’re bound to become a household favorite.
If you loved this recipe, pin it on Pinterest so you can find it easily later. Share it with your friends, baking groups, or anyone who appreciates the art of homemade cookies — because once they taste these, they’ll ask for the recipe every time.
PrintRed Velvet Cookies

Soft and chewy red velvet cookies with a rich cocoa flavor and creamy white chocolate chips. Perfect for holidays, Valentine’s Day, or anytime you crave a bakery-style treat at home.
- Prep Time: 15 mins
- Cook Time: 10 mins
- Total Time: 25 mins
- Yield: 20 cookies
Ingredients
– 1 1/2 cups all-purpose flour
– 1/4 cup unsweetened cocoa powder
– 1 teaspoon cornstarch
– 1/2 teaspoon baking soda
– 1/4 teaspoon salt
– 1/2 cup unsalted butter, softened
– 3/4 cup brown sugar, packed
– 1/4 cup granulated sugar
– 1 large egg
– 1 tablespoon milk
– 1 1/2 teaspoons vanilla extract
– 1 teaspoon red food coloring (gel preferred)
– 3/4 cup white chocolate chips
Instructions
1. Preheat the oven to 350°F (175°C) and line a baking sheet with parchment paper.
2. In a bowl, whisk together flour, cocoa powder, cornstarch, baking soda, and salt. Set aside.
3. In a large mixing bowl, cream together butter, brown sugar, and granulated sugar until light and fluffy.
4. Beat in the egg, milk, vanilla extract, and red food coloring until well combined.
5. Gradually add the dry ingredients to the wet ingredients and mix until just combined.
6. Fold in the white chocolate chips.
7. Scoop dough balls (about 1.5 tablespoons each) onto the baking sheet, spacing them 2 inches apart.
8. Bake for 9–11 minutes, or until edges are set and centers appear slightly soft.
9. Let cookies cool on the sheet for 5 minutes before transferring to a wire rack to cool completely.
Notes
Store cookies in an airtight container at room temperature for up to 5 days. You can chill the dough for a richer flavor and thicker cookies.