Table of Contents
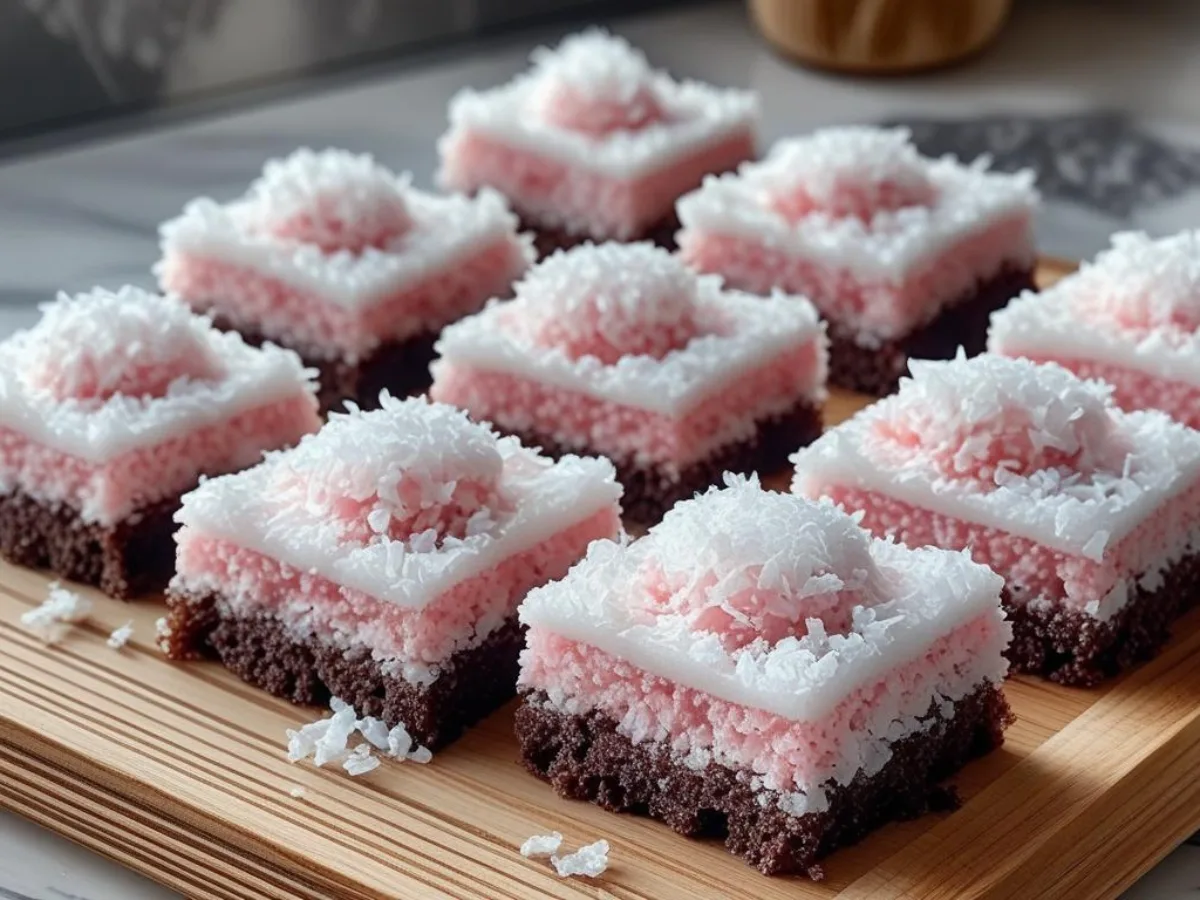
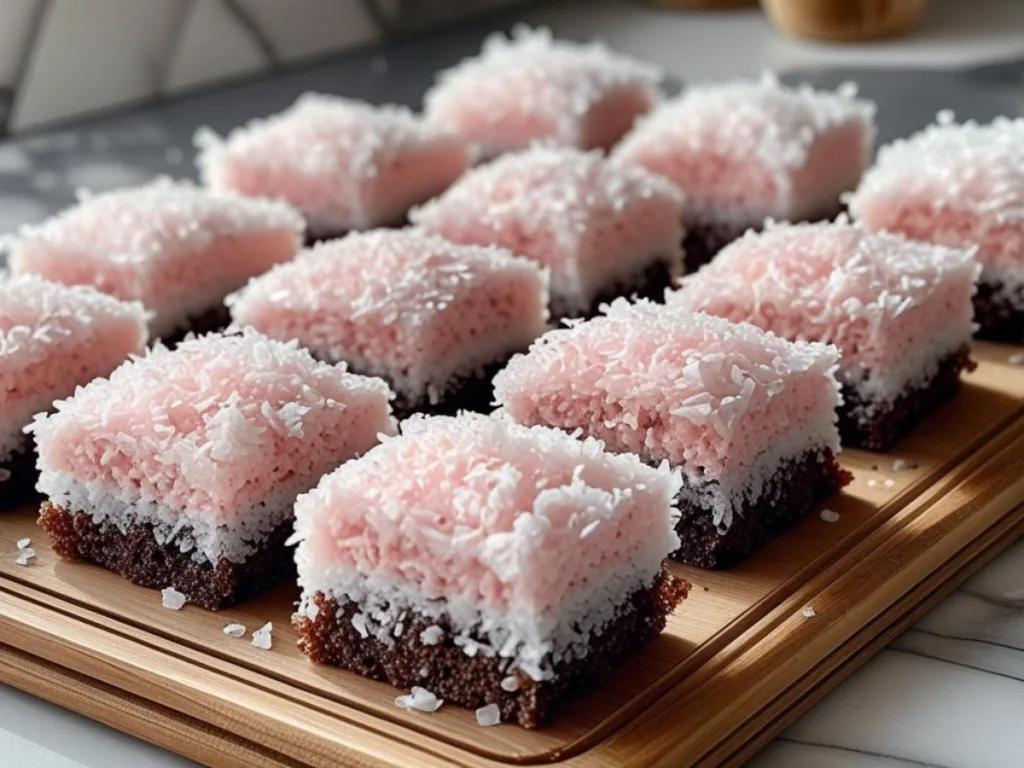
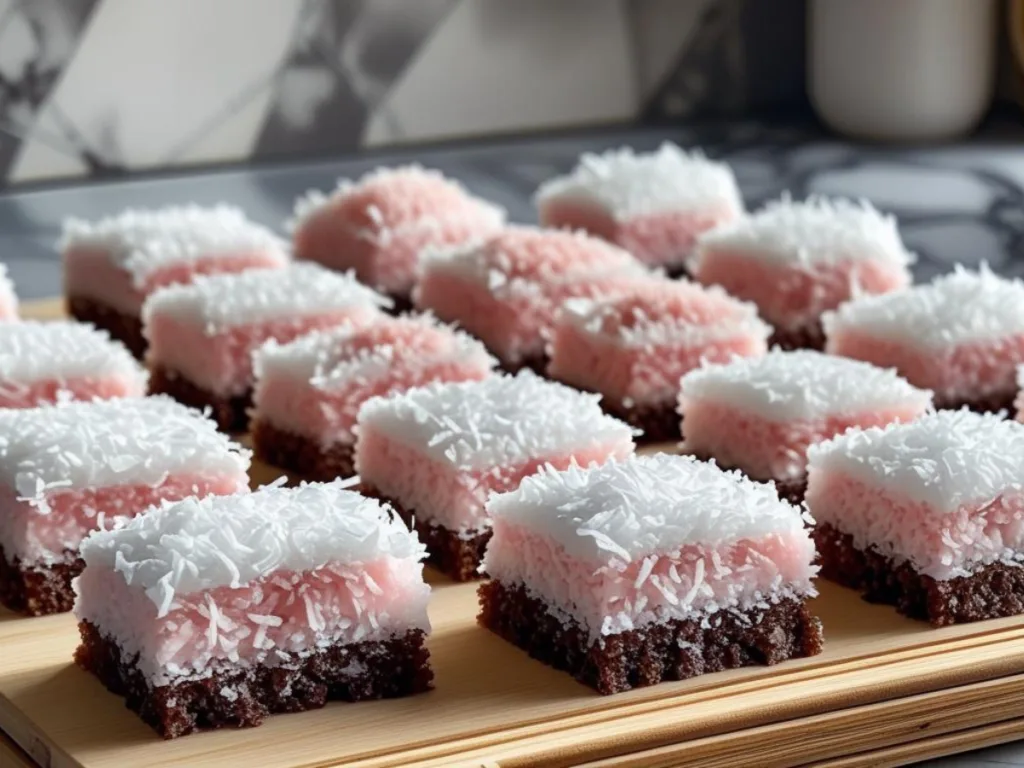
When you think of a classic childhood snack, few things are as iconic as the fluffy, pink-coated snowball. Our Pink Coconut Snowball Cake Bars take that nostalgic inspiration and transform it into an elegant, homemade dessert that is far superior to anything in a plastic wrapper. These bars feature a deeply decadent dark chocolate base, topped with a cloud-like marshmallow frosting and finished with a generous layer of vibrant pink shredded coconut.
It is the kind of treat that stops people in their tracks at a potluck because of its striking color and promises of a light, airy texture. Whether you are hosting a birthday or just want to brighten up a rainy afternoon, these dessert bars provide a sensory experience that balances rich cocoa with sweet, tropical coconut.
Quick Facts / Recipe Snapshot
Preparing these Pink Coconut Snowball Cake Bars is a rewarding process that yields approximately twenty-four generous servings. You will need about twenty minutes for preparation and roughly thirty minutes of baking time, followed by cooling. The difficulty level is intermediate, mostly due to the multi-step assembly of the frosting and topping.
The estimated cost is quite budget-friendly, as it relies on pantry staples like flour, sugar, and unsweetened cocoa. This recipe is naturally vegetarian and can be easily adapted for gluten-free diets by swapping the flour. The result is a moist, chocolatey cake that serves as the perfect canvas for the iconic pink frosting and shredded coconut finish that defines this beloved snack-inspired treat.
What Is This Recipe?
Essentially, the Pink Coconut Snowball Cake Bars are a gourmet, sheet-cake version of the famous marshmallow-filled snack cakes. Instead of individual rounds, we bake a large, moist chocolate cake that is later sliced into convenient bars. The base is a “Devil’s Food” style cake, which provides a robust chocolate flavor that cuts through the sweetness of the marshmallow topping.
The most distinctive feature is the texture; you get the soft crumb of the cake, the pillowy marshmallow fluff, and the slight crunch of the shredded coconut. It is a harmonious blend of textures and colors that makes these bars feel both sophisticated and whimsically fun for eaters of all ages.
Origins & Inspiration
The inspiration for these Pink Coconut Snowball Cake Bars comes directly from mid-century American snack culture, where pre-packaged treats became a staple of lunchboxes. While those original cakes were mass-produced, the modern culinary movement has seen a surge in “copycat” recipes that prioritize high-quality ingredients over preservatives.
My personal connection to this recipe stems from weekend trips to the local bakery, where my grandmother would let us pick one colorful treat; I always chose the pink snowball. This version elevates that memory by using real butter and unsweetened coconut milk to ensure a richer mouthfeel. It reflects a modern American influence where we celebrate nostalgic flavors using better, more wholesome baking techniques.
Why You’ll Love This Recipe
You will absolutely adore the sensory contrast found in every bite of these Pink Coconut Snowball Cake Bars. The dark chocolate cake provides a deep, earthy bitterness that perfectly complements the sugary, light-as-air marshmallow frosting. There is also a visual appeal that cannot be ignored; the bright pink coconut makes these bars the star of any dessert table.
Furthermore, the simplicity of a sheet cake means you do not have to spend hours shaping individual balls or filling cupcakes. It is a high-impact dessert that offers a festive and joyful vibe without the stress of complex pastry work. Each slice feels like a celebratory gift, making it a wonderful way to show love to your family and friends.
Ingredients & Notes
- 1 cup All-Purpose Flour: Use a high-quality brand; can be substituted with a 1:1 gluten-free flour blend.
- 1/2 cup Unsweetened Cocoa Powder: This provides the deep chocolate base; Dutch-processed cocoa works best for color.
- 1 cup Granulated Sugar: Essential for the sweetness and structure of the chocolate cake crumb.
- 1/2 tsp Baking Powder & 1/2 tsp Baking Soda: These leavening agents ensure the cake is fluffy and rises evenly.
- 1/2 cup Unsalted Butter: Softened to room temperature to ensure it creams perfectly with the sugar.
- 2 Large Eggs: Provides structure and richness to the batter; use room temperature eggs for better emulsification.
- 1/2 cup Buttermilk: Adds moisture and a slight tang that activates the baking soda for a tender crumb.
- 1/2 cup Hot Water: Stirring this in at the end “blooms” the cocoa powder, intensifying the chocolate flavor.
- 7 oz Marshmallow Fluff: The key to that iconic, sticky, and sweet marshmallow frosting layer.
- 2 cups Shredded Coconut: Use unsweetened coconut to keep the sugar levels balanced; it provides the classic snowball look.
- 2 drops Pink Food Coloring: A tiny amount of gel coloring creates that perfect, vibrant pink shade for the topping.
Step-by-Step Instructions
- Prepare the Oven and Pan: Preheat your oven to 350°F (175°C) and grease a 9×13-inch baking pan, lining it with parchment paper for easy removal.
- Mix Dry Ingredients: In a medium bowl, whisk together the flour, cocoa powder, baking powder, baking soda, and a pinch of salt until well combined.
- Cream Butter and Sugar: In a large bowl, beat the softened butter and granulated sugar until the mixture is light, pale, and fluffy, which usually takes about three minutes.
- Incorporate Wet Ingredients: Add the eggs one at a time, beating well after each addition, then stir in the vanilla extract and buttermilk.
- Combine and Bloom: Gradually add the dry ingredients to the wet mixture, stirring until just combined, then gently whisk in the hot water until the batter is smooth.
- Bake the Cake: Pour the batter into the prepared pan and bake for 25 to 30 minutes, or until a toothpick inserted in the center comes out clean.
- Cool Completely: Allow the cake to cool in the pan for ten minutes before transferring it to a wire rack to cool entirely before frosting.
- Tint the Coconut: Place the shredded coconut in a bowl or zip-top bag, add the pink food coloring, and shake or stir until the color is evenly distributed.
- Frost and Assemble: Spread the marshmallow fluff evenly over the top of the cooled cake, then generously sprinkle the pink coconut over the entire surface.
- Slice and Serve: Cut the cake into rectangular bars and serve, ensuring each piece has a thick layer of pink coconut and marshmallow.
Tips for Perfect Pink Coconut Snowball Cake Bars Every Time
To ensure your Pink Coconut Snowball Cake Bars turn out perfectly, always start with room-temperature ingredients, especially the butter and eggs. This allows the batter to emulsify correctly, resulting in a cake with a uniform crumb rather than one that is dense or greasy. When mixing the food coloring into the coconut, use a small amount of liquid or gel and work it through with your fingers (wearing gloves) to avoid clumping.
Another expert tip is to chill the cake for about thirty minutes after frosting, but before slicing. This helps the marshmallow layer set slightly, allowing for much cleaner cuts so that each bar looks professionally made and holds its shape on a plate.
Variations, Swaps & Add-Ins
While the classic version is hard to beat, you can easily customize your Pink Coconut Snowball Cake Bars to suit different preferences. If you prefer a lighter base, swap the chocolate cake for a vanilla bean or coconut-flavored sponge cake. For those who enjoy a bit of fruitiness, spreading a thin layer of raspberry preserves over the cake before adding the marshmallow frosting adds a delightful tartness.
You can also experiment with different colors of coconut for various holidays; try a soft pastel yellow for spring or a bright orange for autumn. If you want an extra crunch, consider adding a handful of finely chopped macadamia nuts into the chocolate batter for a tropical twist.
Serving Suggestions
Presentation is everything when it comes to these vibrant Pink Coconut Snowball Cake Bars. To make them truly stand out, serve them on a white ceramic platter, which allows the pink color to pop. You can also arrange them in a staggered pattern to show off the dark chocolate layers.
For an extra touch of elegance, garnish the serving plate with a few fresh edible flowers or a light dusting of powdered sugar. If you are serving these at a sit-down dinner, a small dollop of whipped cream on the side can add an extra layer of luxury. These bars are meant to be eye-catching, so keep the surrounding decor simple and let the pink coconut do the talking.
Best Sides to Serve
Pairing these Pink Coconut Snowball Cake Bars with the right sides can enhance the overall dessert experience. A fresh fruit salad featuring strawberries and raspberries complements the pink aesthetic and adds a refreshing acidity that cuts through the rich marshmallow. If you want something more substantial, a side of high-quality vanilla bean ice cream is a classic choice that pairs beautifully with the chocolate cake base.
For a lighter option, consider serving a few sprigs of fresh mint or a small bowl of lightly sweetened Greek yogurt. These accompaniments help balance the sweetness of the bars while providing a variety of textures for your guests to enjoy.
FAQs
Can I use a boxed cake mix for the base? Yes, you can certainly use a standard chocolate cake mix to save time, though the homemade version offers a richer flavor and better texture.
How do I keep the coconut from falling off? Press the coconut gently into the marshmallow frosting with the back of a spoon to ensure it adheres well to the bars.
Is there a substitute for marshmallow fluff? You can make a thick meringue frosting using egg whites and sugar, though it requires more technical skill than using store-bought fluff.
Can these bars be made vegan? Yes, use a flax egg, vegan butter, and a vegan-friendly marshmallow creme to create a delicious plant-based version.
Love this recipe? Discover even more!
Explore my Pinterest boards for a world of delicious recipes, fresh ideas, and inspiring flavors. Click here and start pinning your next favorite dish! ➜https://www.pinterest.com/ElitesRecipes/
PrintPink Coconut Snowball Cake Bars
Soft chocolate sheet cake topped with a thick layer of marshmallow frosting and vibrant pink shredded coconut. A nostalgic, easy-to-make dessert bar perfect for parties!
- Prep Time: 20 minutes
- Cook Time: 30 minutes
- Total Time: 50 minutes
- Yield: 24 bars
- Category: Dessert
- Method: Baking
- Cuisine: American
- Diet: Vegetarian
Ingredients
1 cup all-purpose flour
1/2 cup unsweetened cocoa powder
1 cup granulated sugar
1/2 tsp baking powder
1/2 tsp baking soda
1/2 cup unsalted butter, softened
2 large eggs
1 tsp vanilla extract
1/2 cup buttermilk
1/2 cup hot water
7 oz marshmallow fluff
2 cups shredded coconut (unsweetened)
2 drops pink gel food coloring
Instructions
1. Preheat oven to 350°F and grease a 9×13 pan.
2. Whisk dry ingredients in a bowl.
3. Cream butter and sugar, then add eggs and vanilla.
4. Mix in dry ingredients and buttermilk, then stir in hot water.
5. Bake for 25–30 minutes and cool completely.
6. Tint coconut with pink food coloring in a separate bowl.
7. Spread marshmallow fluff over the cooled cake.
8. Top generously with pink coconut and cut into bars.
Notes
Use room temperature ingredients for the best cake texture.
Chill the frosted cake for 30 minutes before slicing for clean edges.
Store in an airtight container for up to 3 days.